Upcycled Barn Door Desk

I know many of you have a new way of doing school this year. For us, we were grateful that this was our 5th year in doing online school at home. I devote a large part of my days during the school year to guiding my kids in their schooling. It is time consuming, but I wouldn’t have it any other way. Doing school at home and working with them each one on one calls for a large work space where we can sit together, with room for two laptops, notebooks, snacks and of course my cup of coffee!

Over the summer, I was lucky enough to come across an awesome old door for sale at Schultz’s Wedding & Event Barn. It was old, chippy, and at the time I wasn’t quite sure what I was going to do with it yet, but I knew it had to come home with me.

Door Before!
This old door is definitely needed some TLC and was extremely ‘thirsty!’
Preparing to strip off the top layer of brown chippy paint, using ‘CitriStrip’ stripping gel:

Look what striping a few layers of old paint with CitriStrip + several layers of Beyond Paint Multi Purpose Sealer did for this door! It is alive once again!

I made sure to wear my RZ air filtration Mask, and once I stripped down as much of the top layer of brown paint that I could using a flat edge scraper and CitriStrip, I then washed it all down with a wet rag. This part can get messy, but the end result is so worth it. I lightly sanded down the top, until it had just the look that I wanted, revealing enough of that beautiful green paint. My next step was to give it several coats of Beyond Paint’s Multi Purpose Sealer. I’m pretty sure I over did this part, not because I had to, but because I just wanted over assurance that none of the old paint was going to flake off no matter how rough we were on the desk.

Once the top of the desk was dry, I flipped it over. and measured the width of the desk. I grabbed two boards that I had laying in my wood pile and cut them down to size with my miter saw. I layered on the wood glue, then using wood screws, I attached one board near each end of the bottom of the door. These serve as the supports, so when I attached the hairpin legs, the screws from those don’t come through onto the top of the desk. The boards also help give the desk more stability.

The final step was to attach the hairpin legs into each of the boards, flip the desk over, and get back to school!

Desk After!

I just love taking something that might have otherwise been tossed and turning it into something both unique and useful! My kids and I spend a large part of our days at this desk now and it serves its purpose perfectly and isn’t too bad to look at either!

The two wood chairs are from the 1920’s and I was able to score both of them on Facebook Marketplace for $10 each! Bonus > they rock, swivel and spin!

I plan to give this desk a better photo shoot someday soon, until then, I hope you enjoyed reading about my latest project! Next up, an old kitchen table and chairs that will be given new life and used as a game table at a lake house! Stay tuned, you’re going to love that one!

As always, you can follow along with my DIY Projects and Adventures over on Facebook & Instagram! See you there!

Counter top makeover with Beyond Paint.

Living in a 1920’s farmhouse requires more than just having a country soul, it means so much more than that. It requires a heart that is able to see potential, possibility and one that will pour love into every single part of the farmhouse, including the ugly not so glorious parts.

Now, fixing up a 1920’s farmhouse, on a budget, requires a different set of eyes. Eyes that are able to look at things a bit offbeat than the crowd does and possibly, a little more creatively with a frugal mind.

I may not have that immaculate dream farmhouse you see grace the cover of a diy magazine, but I have a home, that is filled with love and that we pour our heart and souls into.

We purchased our home 3 years ago and ever since have been working on small, frugal makeover projects. We were blessed with a home, that (in our eyes) didn’t need a full gut job in any room. Remember, the simplest, cheapest thing you can do to update your home or space,is to just add fresh paint! That’s a subject for another blog post though, hopefully coming soon!

The last week I have been plugging away on redoing our kitchen counter tops with a paint kit from Beyond Paint. Typically, one could get this done in a day, but between energy lows from Lyme Disease, dentist emergencies, and coaching my kids in online school, it took me 4 days. Also, being the spontaneous artist that I am, I don’t ‘plan’ my projects on free days, I start when I feel motivated and ready to go, even if that is in the midst of craziness, it’s just how I’m wired, and it works(for me).

Here is what our counter tops and our kitchen looked like, when we moved in, aka before I got my hands on this space.  Two years ago, I ripped off the wall paper, painted the walls, and the cabinets and it made an amazing difference and really brightened up the space!

1422590_10152057806335879_2096082501_n1468797_10152057806475879_357531910_n


Beyond Paint’s counter top makeover kit comes with everything you need to transform your old, outdated counter tops, without making your family go without groceries for 6 months.  Granted, this isn’t everyone’s cup of tea, and that is fine by me, but it follows along the lines of one of my favorite sayings, ‘do what you can, with what you have, where you are.’   Our budget doesn’t allow for brand new counter tops, because we all know, if you get new counter tops, you will need new cabinets, and if you get new cabinets, you might as well install that dream farmhouse sink you’ve always wanted, and if you are going through all of this trouble to replace all of that, you might as well open up the wall between the kitchen and the dining room, while you’re at it.  DIY projects and home renovation projects kind of remind me of the children’s book, ‘If you give a mouse a cookie.’ I joke with my kids that one day I will publish one that relates to home projects. Stay tuned on that one.

To prep my counter tops for paint, I made sure to thoroughly was them with a kitchen scrubber and hot water with dish soap, then I dried them with a rag.  I taped off my edges (If you are slow and careful, you can skip painters tape, I do it as ‘insurance’ , mostly because I’ve learned the hard way )

These are what our counter tops looked like before.  They had endured many many years of hard use before we moved in. I was happy to extend their life for a little while longer with Beyond Paint. IMG_6693IMG_6661IMG_6662IMG_6663IMG_6690IMG_6691IMG_6692

Horrible right?  I wasn’t sure that paint could fix something this far gone. It would be a miracle if those deep scratches and stains were covered up.

After washing my counter tops, the transformation began!  I simply, rolled on the base color (Bone) and gave it a good three coats.  The paint went on extremely easily and had a nice thick texture.  I was surprised how much much area was covered from just a little bit of paint.  If you do two thorough coats, that is more than enough, I threw on an extra coat, just because I had enough to do so and it never hurts to have an added layer of protection.

IMG_6713

The above photo was after the first two coats of ‘Bone’.  I liked the clean look of it so much, that I was tempted to leave it a solid color.  Beyond Paint offers a variety of color combos that you can do, which makes it fun and able to fit your style.

After applying the first tone of paint with a roller, I sprinkled on the ‘flakes’, first throwing them onto the vertical back areas of the counters, and then the flat surfaces. I over shook them onto the counters, which I recommend, because after wiping off with tack cloth and sanding down lightly with fine grit sand paper, many will fall off and not stay on.  By over applying, it leaves more than enough behind for a nice look!

This is a step that you can end at as well if you prefer the look (of course after adding a top protective clear coat.  However, I wanted to go all out and do one more step of color)

After applying the flakes, and lightly sanding them down with fine grit sandpaper, I wiped the counters down extremely well with tack cloth. Tack cloth is a sticky cloth that will pick up any of the loose flakes, dust, dog hair, dirt, and debris from sanding.

img_6783.jpg

I then used a sea sponge to blob on Ash grey paint.  I bought a few different sizes of sea sponges, and flipped them from the bottom to the side every now and then, so every smudge of paint didn’t have the same repetitive shape.  After the grey had dried, I wanted to soften it up just a tad, so I took a new sea sponge, and dipped it back into the Bone color paint and lightly dabbed over each dark grey spot and it gave it just the look I had wanted!

Next it was time to make that ugly crack in the corner of our counters disappear. I bought white paintable caulk and filled it in as thick as I could.  It may not hold forever, but for now it looks better.

After letting the counters cure over night, I rolled on 3 clear coats of clear sealer that was included in the paint kit.

IMG_6785

Here are the counters a few days after the had dried!  We love the look and are happy that we were able to extend their life a little while longer!

IMG_6875IMG_6879IMG_6880IMG_6883IMG_6887IMG_6894IMG_6895IMG_6900IMG_6903

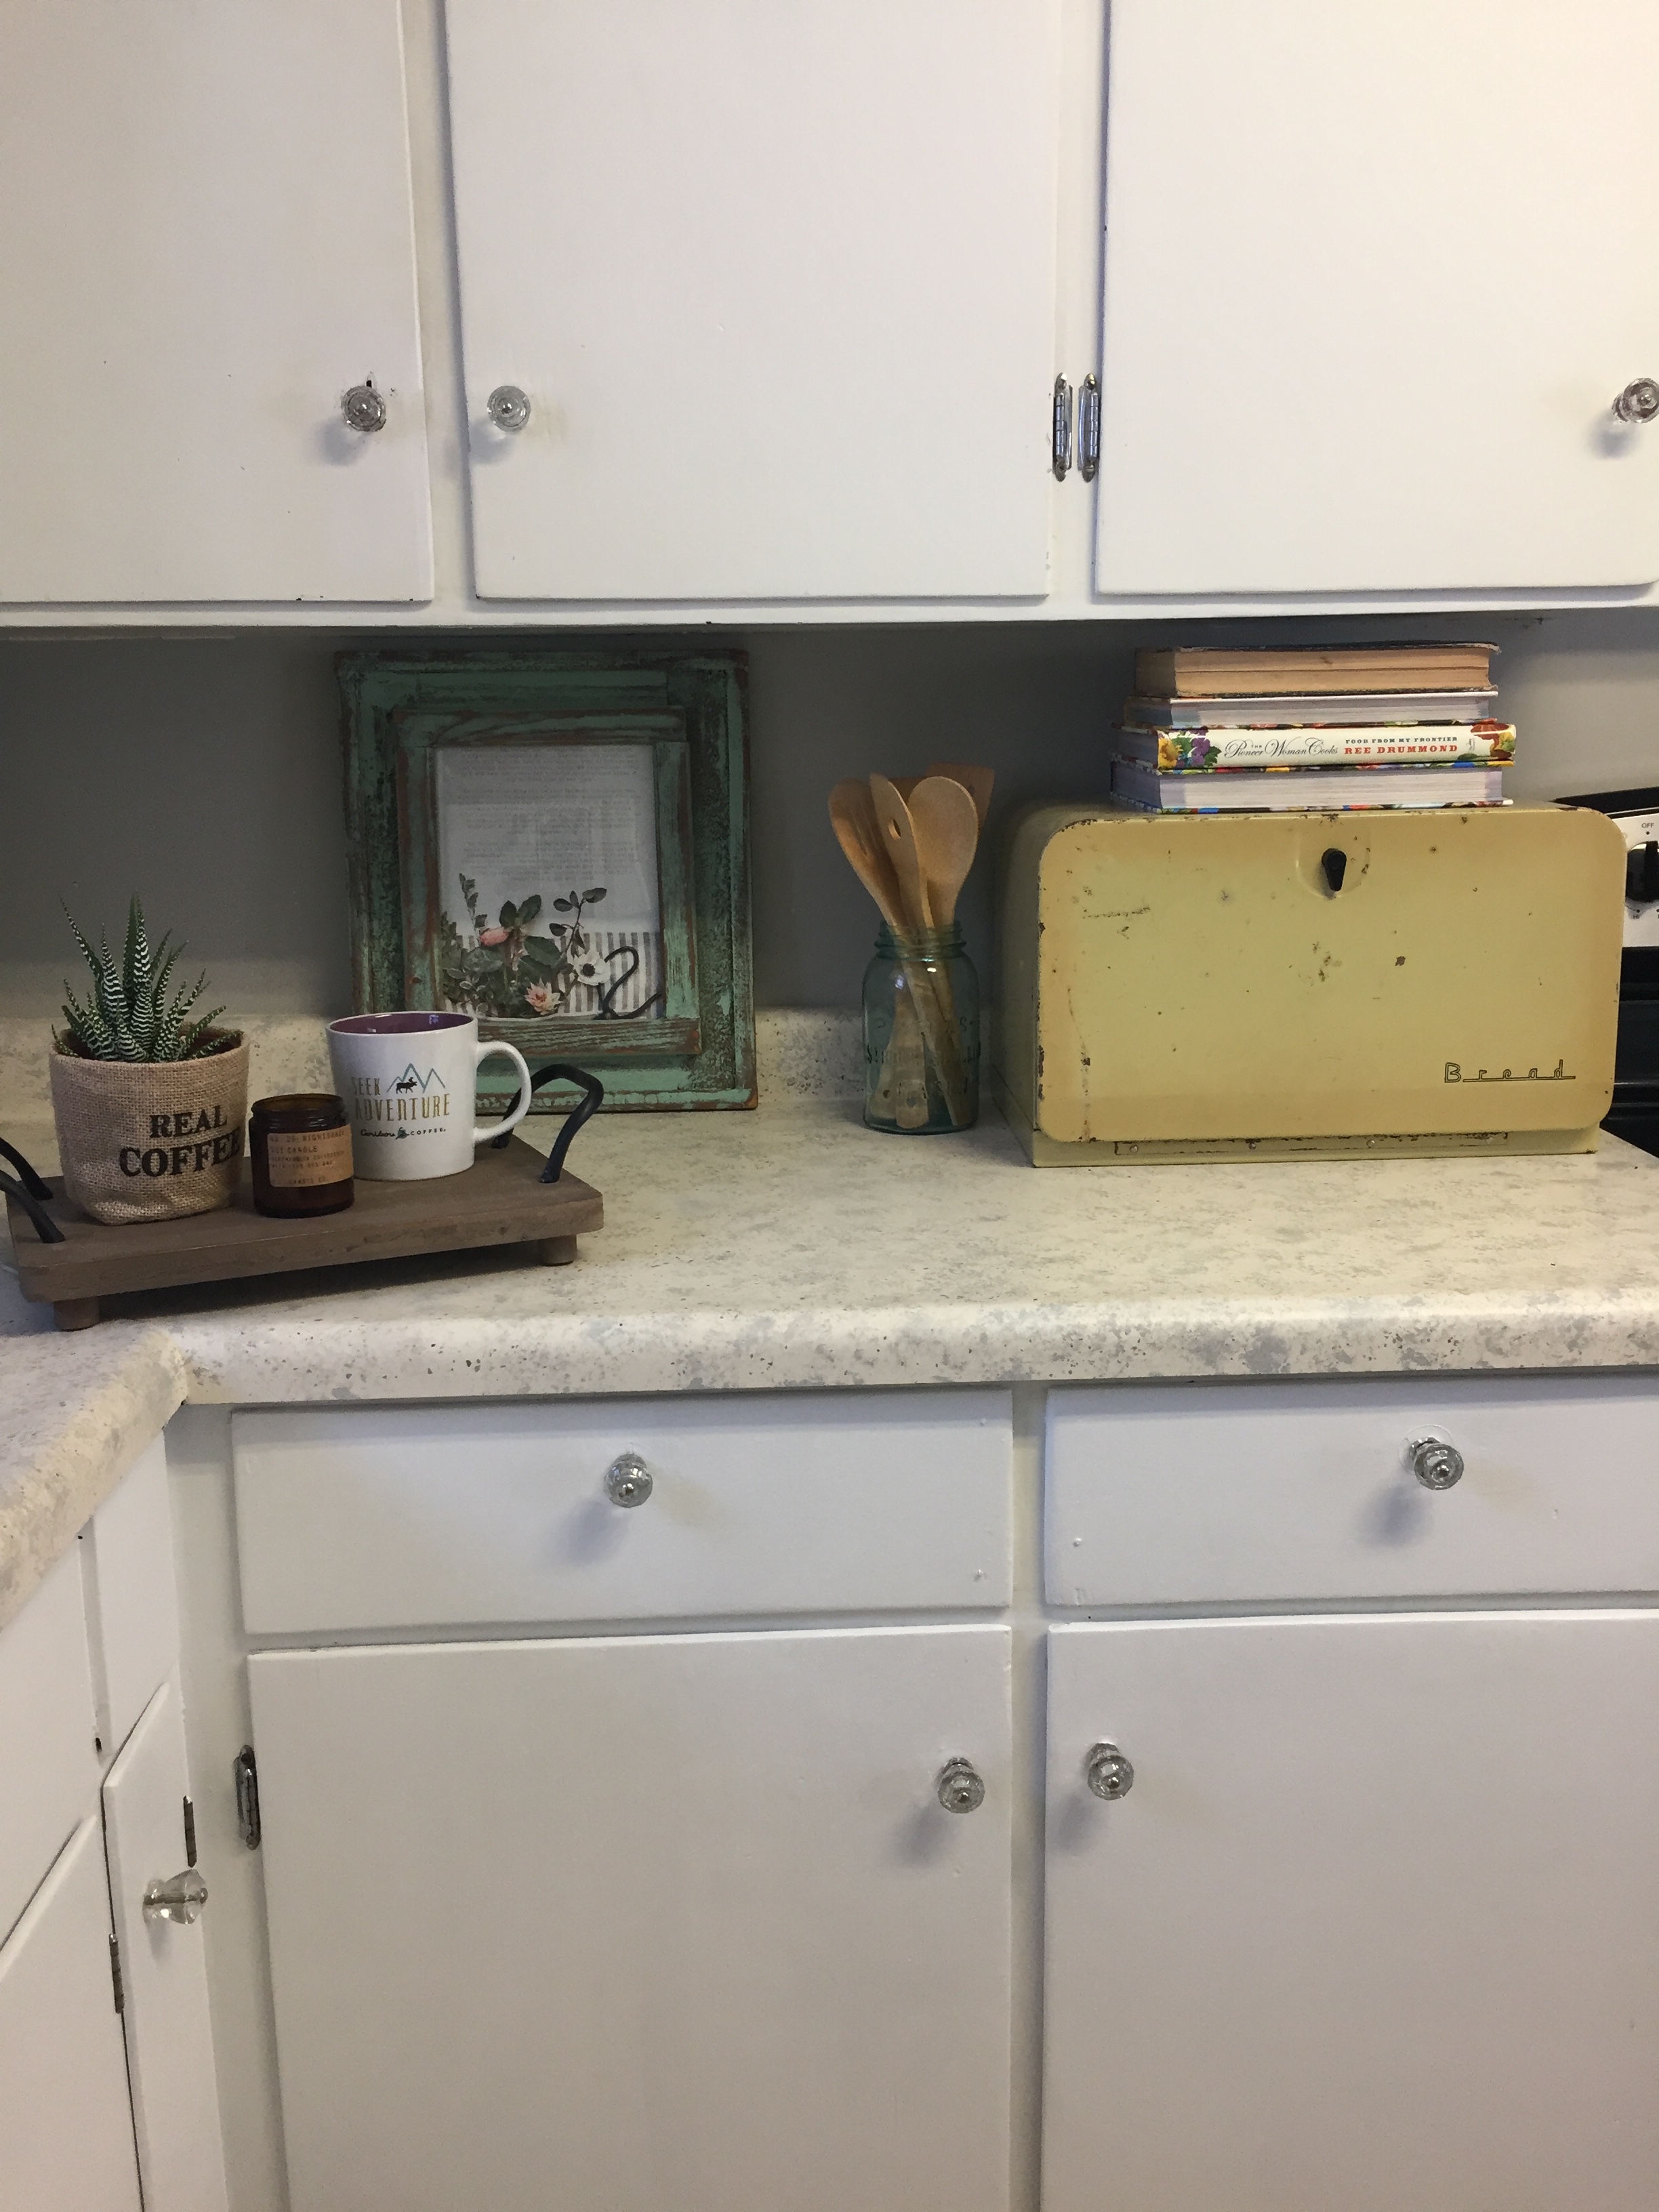
What is a makeover without a little touch of Joanna Gaines? I tore out the Magnolia Manifesto on the last page of their Spring journal and tucked it into a frame, made by ‘Once Abarn a Time’ . It looks beautiful and I absolutely love the words.

IMG_6864

Interested in giving your sad counter tops a refreshed look like I did? Head on over to check out Beyond Paint and see what they can do for you and your home!

I am very please with the paint kit from Beyond Paint, and I would highly recommend it to anyone looking to rescue their old counter tops!

As always, you can follow along with more of my DIY projects and antiquing adventures over on Facebook.

signature

Tv dresser with Beyond Paint

Today I wanted to share with all of you a great line of paint, called ‘Beyond Paint’. 

I was recently contacted by Beyond Paint to give their furniture makeover kit a try.

On their website, Beyond Paint says the following about their product:

“No Stripping, No Sanding, No Priming
BEYOND PAINT™ your cabinets, furniture and accessories in one convenient kit!
Refinish almost any surface with this combination bonder/primer/finisher that cures to a durable, washable surface in just one or two coats. Application is foolproof, and the result is a beautiful, professional finish that will transform your home.
The amazing BEYOND PAINT™ Cabinets Furniture & More Makeover Kit also includes the best tools for the job for your convenience and ease of application saving you money and hassle on your home projects.”

The furniture makeover kit came with everything that I needed to complete my furniture makeover project, it even included an instructional dvd!

img_5957

The Beyond Paint Makeover Kit Includes:

  • Paint (Quart)
  • Roller Handle
  • Roller Cover
  • Chip Brush
  • Tray
  • Instructional DVD
  • Brochure

For this project, I decided to update the TV dresser that is in our living room. My interior design style has matured a lot in the past couple of years, and I went from loving dark rustic colors only, to really embracing bright and light natural colors, with touches of wood tones. Last Fall I also painted our living room, for the second time. When we moved into the farmhouse 3 years ago, the walls were a dirty, smokey off-white, and I painted them a soft blue. After time I realized I didn’t like designing around blue walls, and now went with a super soft grey with blue undertones and it is so much easier to incorporate other colors into my space with that tone as a backdrop.

This is what our TV dresser looked like before I gave the makeover with Beyond Paint a go:

dresserbefore

In the winter months, my furniture makeovers usually take place in my dining room (sorry family!). I am still working on getting my little workshop heated so I can tackle more projects even when the temperature drops below 40 degrees.

Since my dresser was previously painted, and Beyond Paint requires no stripping, sanding or priming, this was an extremely easy and quick project. All I needed to do to get started was wipe down the dresser with a wet rag, dry it off, make a big cup of coffee and I was on my way!

Here are the results of just two quick coats of the color ‘Nantucket’ by Beyond Paint!

img_5961

img_5981

img_5982

img_5833

img_5949

This blue adds a nice pop of color to our living room, without being too overwhelming. When I walk into our space, my mind feels relaxed and refreshed and I am surrounded by colors that remind me of beautiful Lake Superior and colors found in nature.

I finally feel content with the gallery wall as well. If you have a gallery wall somewhere in your home, you will understand when I say that it is an ever changing and evolving project.

I absolutely loved the final result and the ease of use of Beyond Paint. The paint goes on nice and thick and has amazing coverage!  I look forward to using Beyond Paint products again the future, and am hoping to give their counter top paint a try this Summer!

As always, you can follow along with my DIY projects by subscribing to my blog, and by following Anchored Way on Facebook  You can also shop Anchored Way Trading Co. custom furniture, home decor, vintage goods, jewelry and art 7 days a week at my booth that is located at The Shed (1519 Mayer Road, Altoona, Wi – Booth # 56 ) !
Decor Sources:
Paint provided by Beyond Paint .
The “W” and deer print in the center are both from the amazing Hobby Lobby, the Hope canvas I found at JoAnn Fabric and Craft Store,  the amazing scented soy candle is from PF Candle Co and was purchased at Reds Mercantile in Eau Claire,Wisconsin,  the the rock canvas is my own photograph that I took along the shores of Lake Superior in Northern Minnesota, and the little clip board was my Grandfathers and I currently have a cute little vintage car picture that I actually reused and cut off of a Christmas gift bag!

signature


Potato Sack Ottoman

“The seeker embarks on a journey to find what he wants, and discovers, along the way, what he needs.”

Two weeks ago I came across a great little ottoman at Hope Gospel Mission Bargain Center in Eau Claire, Wi for $3.00!  After my employee discount the total came to around $2.80! What a deal! (p.s. a tip for shopping there, if you are 50+, on Tuesdays you can save 20% off your entire purchase ! )

I just loved the style of this ottoman and knew it was a piece of furniture that I could breathe new life into.  Below is what the ottoman looked like as I found it at the Bargain Center, and what was underneath that dirty green fabric!

I let it sit in my living room for a few days, where I could see it, and try to figure out a plan for it. I kept going back and forth between giving it a light beach cottage feel, or a Western rustic style.

As I looked around my home to see what I had for material to cover the top of it, I came across an old potato sack that I found last year at Oronoco Gold Rush Days, where I went on a hunt for anything that had a Western design or feel to it.
The potato sack was dirty and had stains all over it, that discouraged me a bit, but then I discovered that I could simply just wash the stains out!

Below are photos of the potato sack getting a bath.  I simply filled the bath tub with warm water and a bit of laundry detergent and gave it a good 10 minute soak, then scrubbed gently with a scrub brush in the areas that it had dirt stains, wrung it out, then hung it out on the clothesline to dry over night!


Once the potato sack was fully dry, I cut it open along the seams on the side and bottom, laid it out on the floor, image side down, set the ottoman upside down on top it it and cut a circle about 4+ inches bigger than the ottoman, so I would have enough material to go over the sides, and underneath the ottoman where I then secured it with staples, using a Staple Gun.    After the potato sack was secured, I then painted the legs red and topped them off with Minwax Polyshades stain + poly, and it was finished!

This was a really fun and easy project and the great part is that if I decide I want a different style, it is simple to removed the potato sack and recover the ottoman!  But for now, it looks right at home in our old farmhouse.

I hope this blog post has inspired you to see beyond what something IS and to see what it’s potential can be!

Have a beautiful Sunday, get outside and enjoy the sunshine!

Remember, you can follow along with my DIY adventures over on Facebook as well!

signature

Travel inspired desk.

“For my part, I travel not to go anywhere, but to go. I travel for travel’s sake. The great affair is to move.” – Robert Louis Stevenson

If you are a regular follower of Anchored Way Trading Co, you by now know that I am a lover of travel, adventure, wandering back roads and the outdoors. I find myself often day-dreaming of driving the car, down an old back road in the mountains of Montana, windows down, radio on, the wind blowing through my hair… (okay let’s be realistic,  … * the wind blowing my hair into my face…) , and nowhere to go, ..but everywhere.

I’m a dreamer.   A day dreamer, yes.  A night dreamer, of course, but most importantly,  I believe in the dreams that God has instilled into this heart of mine.   Progress, no matter how slow, is progress.   A step forward, is still a step, no matter if it’s a running step or a walking step.    Little by little, we get closer to becoming who God created us to be.

With each piece of furniture I create, I feel more like me & I feel my wings opening further.  This, an artist, is who I am.   I am here, to create and inspire you.

I came across this lonely desk while I was working at Hope Gospel Mission Bargain Center in Eau Claire, Wisconsin and knew it needed to come home with me to my workshop.  I knew, it had potential, I could see it.

Desk -- Before

I was originally planning on giving the desk a new life and selling it at my favorite little local coffee shop, The Living Room Coffee House in Eau Claire, but once finished and placed in a corner of my living room,  it was like the desk looked at me and said ‘Let me stay right here,’  and there, it still sits.  Now it has a new life, a new home and is once again loved and provides my kids and my family with a little school / home work station and organization for all of the papers they bring home from school every day.

deskcollage

adc_7520wm

adc_7528wm


There it is friends!   Completely  perfect for our family!   I used an old Montana map, that shows two of the towns where my kids first saw the mountains a few years ago on a road trip.  I was blessed to have been given my late Grandfathers chair that he used in his basement workshop at his desk, every time I look at it, my heart smiles, and every time I sit in it, like I am now, writing this blog post, I know my Grandfather would be proud of the work I do.

If you are interested in a custom furniture piece, like this for your home, or place of business, feel free to contact me with any questions; endlessacres@live.com

You can also follow Anchored Way Trading Co. on Facebook.

Have a blessed day- get out there and unleash your inner artist!  Dream, Create, Believe in yourself!

signature


Products used in this transformation;

9 drawer dresser.

“As soon as I saw you, I knew an adventure was going to happen.

~ Winnie The Pooh

My son just turned 10 last week.   I am trying my hardest to not let his age make me feel sad about the fact that I am losing my ‘baby’ boy.   It is a hard transition when they go from sweet little boy who follows mommy everywhere  to becoming so independent and not needing their mommy as much any more.   I miss those pounding little fists on the bathroom door every time I take a shower, I miss the tugging of the pant legs when I am needed for something, I miss the sweet calls of  ‘Mommy come play with me’ from the other room.   But I am also thankful to God that my son is a healthy, adventurous boy who has been with me for 10 wonderful years.    He has now grown into someone who loves the Lord, enjoys a good conversation about anything that involves facts,  loves getting dirty in the mud, and is one of the greatest travel buddies I’ve ever had.

Lately he has been really interested in my projects, and has been asking me what I will be working on next when I am in between projects.   He has enjoyed going with me searching for my next project and I can see a huge change in him that has happened recently, where he is really understanding and appreciating the work and love I put into my furniture makeovers.   As a mother, it is such a great feeling to have a son that wants to learn from you and also looks up to you.  And now I also see, that even though he is getting older, he still does need me, just in different ways.   This morning before school, he hugged me and said “Mom, thanks for making my new dresser and my other desk too, I really like them both.”  Ahh, talk about melting a mothers heart!

I have slowly been working on getting his room together and out of all of the rooms in the house, his is still my favorite, and the closest to being ‘complete’ .   Last year, I worked on making over an old desk from a thrift store for his room, and this year I have been in search of a long dresser with plenty of drawers for his clothes & toys.   I was lucky enough to have a friend donate a dresser to me over the weekend and once I saw it, I knew it was exactly what I had been looking for , for my little mans room!

This is what the dresser looked like before;

www.endlessacresfarmtiques.com

I let my son pick out the colors and theme for the dresser.  Below is a list of the changes that I made;

  •  Stained the top of the dresser & legs with 3 coats of Minwax Polyshades in Classic Black.
  • Painted dresser & drawers in red satin paint.
  • Stained over the entire dresser & drawers with Minwax Poly-shades in Classic Black (which is stain + polyurethane) to give it a dirty/aged look as my son requested.
  • Lined the drawers with ripped out pages from a 1973 issue of Popular Science Magazine.

I decided to use the original copper pulls that were on the dresser, I just love the patina that they have and their simple, straight lines.

dsc_8699wm

I completed this dresser in a day and today I am planning on setting it up in my sons bedroom to surprise him with the complete product when he gets home from school

dsc_8688wm

I hope you have enjoyed my latest furniture makeover, and that you leave feeling inspired to take on a project at your house too!

Thanks for reading,

~Kelly

Pretty in pink vanity.

Let your smile change the world, but don’t let the world change your smile.

My sweet darling 5 year old daughter is one of my greatest joys.  For several months she has been asking me for a pink dresser.    I’m happy to say that I finally found her a beautiful wood vanity that was in need of a major revival.

Below you will find the steps I took to transform this beat up brown vanity into a beautiful pretty in pink vanity for my daughter.

vanity makeover

Sanded down entire piece, including drawers.  Wiped off debris and dust with tack clothes.

Applied 3 layers of pink paint to entire piece, including the drawer sides and one top coat of clear Minwax water based polyurethane in Satin finish to add extra protection.

Lined drawers with old story book pages, using Mod Podge .
Taped off sides of drawers to add a 3″  turquoise strip sides of drawers.

Pink Vanity www.endlessacresfarmtiques.com

Drilled new holes for new hardware.   This time, the drawer pulls covered up the old holes, so no wood filler was needed.

IMG_1311

I finished this project in 2 days time, and had it all set up in my daughters room for her to see when she got home from school today.   She was so excited , she even started jumping up and down.  Success! 🙂

Here are the after photos, enjoy!


dsc_8593wm

dsc_8600wm

I am really happy with how this vanity turned out, and even happier that my daughter loves it!   Her room is finally starting to look like a bedroom!

Thanks for reading, I hope you all have a wonderful night and weekend!

~Kelly

Potato Bin End Tables.

Have you ever had an ah-ha moment?!  As an artist and entrepreneur, I find myself getting several… every single day.   How do I know which ones to take seriously and which ones to let go?!   That is the hard part.  This can sometimes be overwhelming for many artists and entrepreneurs, but that is where focus and vision come into play.   If I gave in to every single idea I had, I would either be A.) completely broke B.) completely tired or C.) go completely insane.    I don’t want to be any 3 of those!  I want to continue to love what I do.  So, if I get an idea and I can’t make it happen right away, I will write it down in a notebook and sometimes, the idea never travels further than between the lines on a white piece of paper, but for me, that is enough, and I have come to be okay with that,  for most ideas.   Sometimes I will come back to an idea 1 year later and make it happen as well.    Then sometimes, there is an idea , or an ah-ha moment like I mentioned above, that I see so clearly in my head, that I have to jump up at that exact moment and make it happen.   These potato bin end tables, are one of those ideas.


I have had these old wood potato bins for about a year, they have traveled to two different homes with me as I’ve moved, and have been used in about 6 different rooms for different purposes, like shoe boxes in the porch, stacked 2 high for shelving in my daughters room, set next to each other to make a bench,  put together for a coffee table in the basement, or filled with toys.   None of those ideas, although neat, felt like they were how the bins were to be given a new life.   They were meant for something more.

I took the bins and jumped into a project the day after the idea was visualized in my head.

bin1

I stripped the old paint off of the back side of the bins, which would now be the top part of the end tables.

bin2

Once most of the paint was stripped, I sanded down the tops so they were smooth.


I painted the bins in a beautiful green, called ‘Preppy Green’ (the same green I also recently used on a desk makeover ) ,

bin3

Next, I used a brown stain + polyurethane from Minwax , called Minwax Polyshades in Espresso brown to lightly go over every side of the bins.  This worked great as the stain stuck in all of the imperfections of the bin, showing off  their age and history and giving them a more antique look.    I stained the new tops of the bins with 2 coats of the same stain to give them a unified look and make them be viewable as actual end tables, not just potato bins, and for a bit of sophistication.

I am completely happy with how they turned out, and even more ecstatic that the vision I saw so clearly in my head, is now in my living room and I can look at them every day, knowing I DID IT and I brought my vision to life!

Below are the after photos,  I hope you like them as much as I do!

bin4bin5


Thanks for reading,  for more inspiration from Anchored Way, visit me over on Facebook!

~Kelly

Purple nursery dresser.

Over the Summer I had a potential client come to me with a request to find and makeover a dresser for their (soon to be) bundle of joy that would be arriving sometime in September of this year.

We worked together searching online and in stores to find just the perfect dresser that would fit their needs and style.   She found a wonderful piece on Craigslist, dropped it off at my house- and I got to work!

Here are the before and after photos from the makeover I did, enjoy!

  Dresser Before;

1

Dresser After;

2

3.jpg

After priming, painting, drilling holes & adding new hardware, and lining the drawers- this dresser was all set for a sweet newborns’ nursery!

Thanks for reading,

~Kelly

First house bathroom makeover.

“If you’re lucky to be at the beach, then you’re lucky enough!”

My Home bathroom makeover:

beforeafter

This is a transformation I completed Fall of 2011. I thought I would share quickly how I changed the entire look of my bathroom in just a few short days and using a few simple steps & products.

Upon moving into our first home in April of 2006, our small bathroom was tan, had a border of bear wall paper, and well, eventually just started feeling cluttered, non modern -and needed a much more serene & modern feel.

Bathroom before;

Bathroom after;

bath1

bath3

What I changed:
*Removed misplaced cabinet above sink/next to mirror. & donated it to Building Hope in Eau Claire.
*Removed wallpaper border
*Painted walls ‘light turquoise mist’.
*Painted cabinets white
*Added oil rubbed bronze cabinet knobs/pulls
*New Mirror
*Replaced light fixtures -oil rubbed bronze
*Painted door/trim white
*Added 2 hooks for towels near shower
*Replaced sink faucet- oil rubbed bronze
*New neutral shower curtain
*Primitive Ladder behind door for hand towel & magazines
*New towel hooks on wall & on back of door

What I would still like to change:
*Replace counter top with a soft beige/natural color
*Replace flooring

I have always loved the beach. The smell of the fresh water, the wind in my face, the gentle roar of the waves all combine to create a sense of peace and calm, and that is exactly the feeling I was going for with this makeover.

When searching for a theme for your home, or just for 1 room, think about what makes YOU feel at home, what makes your heart happy?! Is it the beach? Is it the woods? Is it the countryside? Or maybe you just love a certain style- vintage, shabby chic, modern, etc. Whatever you love, bring it into your home in small, subtle ways. There is nothing better than walking into a room in your own home, and saying to yourself “I did this!” AND to feel at peace when you walk into your space after a long day of work -is pretty amazing.

So be creative and make your home and your space- YOU!