Tv dresser with Beyond Paint

Today I wanted to share with all of you a great line of paint, called ‘Beyond Paint’. 

I was recently contacted by Beyond Paint to give their furniture makeover kit a try.

On their website, Beyond Paint says the following about their product:

“No Stripping, No Sanding, No Priming
BEYOND PAINT™ your cabinets, furniture and accessories in one convenient kit!
Refinish almost any surface with this combination bonder/primer/finisher that cures to a durable, washable surface in just one or two coats. Application is foolproof, and the result is a beautiful, professional finish that will transform your home.
The amazing BEYOND PAINT™ Cabinets Furniture & More Makeover Kit also includes the best tools for the job for your convenience and ease of application saving you money and hassle on your home projects.”

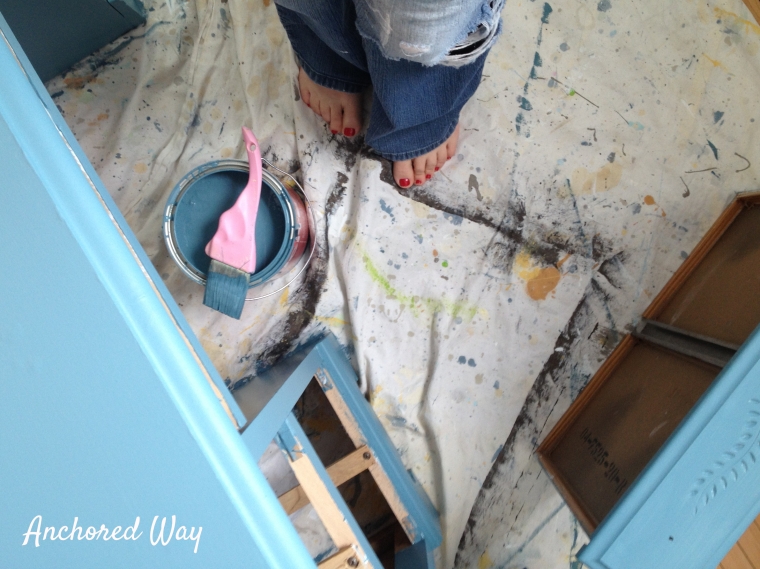
The furniture makeover kit came with everything that I needed to complete my furniture makeover project, it even included an instructional dvd!

img_5957

The Beyond Paint Makeover Kit Includes:

  • Paint (Quart)
  • Roller Handle
  • Roller Cover
  • Chip Brush
  • Tray
  • Instructional DVD
  • Brochure

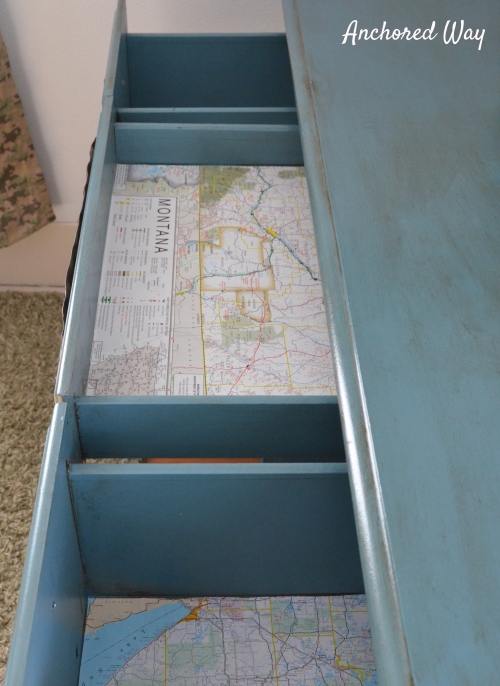
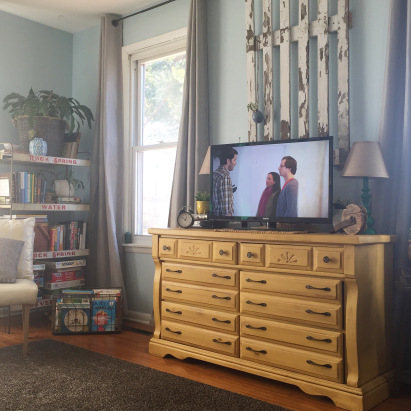
For this project, I decided to update the TV dresser that is in our living room. My interior design style has matured a lot in the past couple of years, and I went from loving dark rustic colors only, to really embracing bright and light natural colors, with touches of wood tones. Last Fall I also painted our living room, for the second time. When we moved into the farmhouse 3 years ago, the walls were a dirty, smokey off-white, and I painted them a soft blue. After time I realized I didn’t like designing around blue walls, and now went with a super soft grey with blue undertones and it is so much easier to incorporate other colors into my space with that tone as a backdrop.

This is what our TV dresser looked like before I gave the makeover with Beyond Paint a go:

dresserbefore

In the winter months, my furniture makeovers usually take place in my dining room (sorry family!). I am still working on getting my little workshop heated so I can tackle more projects even when the temperature drops below 40 degrees.

Since my dresser was previously painted, and Beyond Paint requires no stripping, sanding or priming, this was an extremely easy and quick project. All I needed to do to get started was wipe down the dresser with a wet rag, dry it off, make a big cup of coffee and I was on my way!

Here are the results of just two quick coats of the color ‘Nantucket’ by Beyond Paint!

img_5961

img_5981

img_5982

img_5833

img_5949

This blue adds a nice pop of color to our living room, without being too overwhelming. When I walk into our space, my mind feels relaxed and refreshed and I am surrounded by colors that remind me of beautiful Lake Superior and colors found in nature.

I finally feel content with the gallery wall as well. If you have a gallery wall somewhere in your home, you will understand when I say that it is an ever changing and evolving project.

I absolutely loved the final result and the ease of use of Beyond Paint. The paint goes on nice and thick and has amazing coverage!  I look forward to using Beyond Paint products again the future, and am hoping to give their counter top paint a try this Summer!

As always, you can follow along with my DIY projects by subscribing to my blog, and by following Anchored Way on Facebook  You can also shop Anchored Way Trading Co. custom furniture, home decor, vintage goods, jewelry and art 7 days a week at my booth that is located at The Shed (1519 Mayer Road, Altoona, Wi – Booth # 56 ) !
Decor Sources:
Paint provided by Beyond Paint .
The “W” and deer print in the center are both from the amazing Hobby Lobby, the Hope canvas I found at JoAnn Fabric and Craft Store,  the amazing scented soy candle is from PF Candle Co and was purchased at Reds Mercantile in Eau Claire,Wisconsin,  the the rock canvas is my own photograph that I took along the shores of Lake Superior in Northern Minnesota, and the little clip board was my Grandfathers and I currently have a cute little vintage car picture that I actually reused and cut off of a Christmas gift bag!

signature


Minneapolis Home & Garden Show 2016

“As we let our own light shine, we unconsciously give other people the permission to do the same.” – Nelson Mandela

If you are an artist in any form, (painter, architect, contractor, wood-worker, writer, photographer, etc) than you understand how important continually finding inspiration is.    Sometimes as artists, we can get inspired by something we see on tv, a magazine, a walk in nature, or attending an event like the Minneapolis Home and Garden Show!

This past Saturday, I attended  The Minneapolis Home and Garden show.

My husband dropped the kids and I off at The Minneapolis Convention Center around 9:45 am, we flew in the doors in a rush to hear Matt Muenster speak at 10:00! We made it to the area he was at, 5 minutes prior to show time!  If you have never been to the Convention Center, it is a very big space, especially when you don’t know exactly where you are going.

Matt is an interior designer, licensed contractor and tv personality on HGTV’s Bath Crashers.  He is also partnered with Decolav and has teamed up with them to create an exclusive collection of stylish bathroom products.

Matt walked out onto the stage dressed sharp with a big heart warming smile on his face.


He gave a wonderful talk and I truly felt so inspired while listening to him.  He shared some insider information about Bath Crashers, how they pick the Bath Crasher winners, “You need to be the coolest of everyone we talk to!” He said.  I liked that.  His honesty, his humbleness and knowledge poured out of him during his talk.  He also shared some tips about crashing your own bathroom, and mentioned to focus on one statement piece, as in a custom mural wall.  One thing that really stuck with me that I will take with me while working on our own bathroom, is to not waste your bathroom space, “It is valuable square footage,” Matt said, “Don’t waste it just to go in and out of to take care of business, make it a place to relax.  If you like coffee, put in an espresso maker. (He is speaking my language there!)   “Don’t worry about what the neighbors think, what the next possible home owner may think, incorporate what you love into your space!”    I wish I would have videoed his entire talk!

We were blessed with the opportunity to meet Matt and get his signature and a photo.   My 7 year old daughter made Matt a birthday card which included a Bathroom Mood Board on the inside with bathroom design pieces from my magazines, like a bath tub, lighting, sink, wall hangings, flooring, paint color etc.


After the excitement of meeting Matt, we headed into the Auditorium to see The Property Brothers!  We got into the auditorium over 40 minutes prior to their talk, and it was already over half way full.  They drew a crowd of thousands! When they walked out onto stage, just like when Matt did, the kids looked at me, and I at them, and we all were embracing the fact that these incredible men that we see just about daily in our living room, on television- are real! Just like us!  Camryn kept saying, “Mommy this is so weird!”

Drew and Jonathan Scott, of the Property Brothers gave out some great advice about real estate investing, paying off your mortgage, and of course they tied in some humorous skits and videos as well.  They are quite the funny duo!


img_7295
The kids with The Property Brothers, kind of.
img_7311
Rayce waiting for The Property Brothers to take the stage!  Look at that crowd!
img_7321
Drew and Jonathan Scott on stage.

img_7319-1
img_7322-1

img_7328-1
Hey look, here we are with The Property Brothers! Again, kind of.

After The Property Brothers finished their talk, and we rushed back to see them again on the smaller stage.  We enjoyed a few delicious popcorn samples near by, when we heard Matt Muenster call out Camryns name!  She smiled so big!  He thanked her again for the birthday card, and we took the opportunity for another photo with him.  This guy is a class act!   As we walked away, Rayce said, “I can’t believe he remembered Camryns name!”  Then Camryn said,”I think  it’s because I was wearing a blue jacket.”    Camryn has been carrying around her signature from Matt everywhere, since we got home on Saturday night and she asked that it be hung above her creative art area, so she can see it while she is working her art projects.

img_7357
The kids and I with Matt Muenster of HGTV’s Bath Crashers.


img_7388

Once our excitement decreased from getting to talk with Matt again, we wandered around the Home Show and enjoyed some lunch.  We only got through about 1/3 of the booths in the limited time that we had.  Next year we will be sure to allow more time to enjoy at the show.

Ms Macs Antiques.  Such a beautiful booth set up!


I love this guy!

After lunch, we headed to the long line to wait to go look at the Tiny Home Village! My 12 year old son was begging me to go see these.  I am so glad we did!  I loved the simplistic design and really loved the way that they were staged inside.  The details are important1  I see myself having a Tiny Home someday, tucked alongside a big mountain, for a second vacation home.  I’m a big dreamer, with dreams of a little house in the mountains.

This was my sons favorite Tiny Home.


What a fun day!  I left the home show, feeling so inspired, after meeting Matt, hearing him and The Property Brothers talk, and seeing all kinds of project ideas I could incorporate into my own home.   I would highly recommend the Minneapolis Home & Garden show to anyone who is looking for ideas, inspiration, or quality craftsmen and women who can help them bring their ideas for their home, to life.

I am already looking forward to our adventures at the home show next year!  Maybe I will see you there too?!

Remember you can follow along with my DIY adventures over on Facebook too!

signature


TV Stand dresser.

   ‘ The art of living is always to make a good thing out of a bad thing.’

  ~ E.F. Schmacher

Art to me is about vision.  It is about seeing potential in something that others may not see.  It is about taking something and changing it, making it unique , making it your own.  It is about expanding your eyes to see beyond the norm and the usual.  Today’s project is just that.
It is about how I took a normal little white dresser and made it into something different, and gave it a new life as a TV stand.

Here is the dresser as it was before:

tv dresser before www.endlessacresfarmtiques.com

Here is a list of what I did to the dresser to make it into a tv stand;

  • Sanded, and painted entire piece,  including sides and insides of the drawers in Sherwin Williams ‘Light French Grey’ paint.
  • Removed the top drawer and added in old cedar fence boards using small finishing nails, to make a shelf.
  •  Drilled small hole into back wall of dresser to allow cords to go through if used as a TV stand.
  • Replaced original hardware with yardsticks for drawer pulls.  The yard sticks have been stained lightly.

Here is the dresser after;

dsc_8834wm

Thanks for viewing my latest project!  If you like what you see here on the blog, you can follow along with me on Facebook!

~Kelly

9 drawer dresser.

“As soon as I saw you, I knew an adventure was going to happen.

~ Winnie The Pooh

My son just turned 10 last week.   I am trying my hardest to not let his age make me feel sad about the fact that I am losing my ‘baby’ boy.   It is a hard transition when they go from sweet little boy who follows mommy everywhere  to becoming so independent and not needing their mommy as much any more.   I miss those pounding little fists on the bathroom door every time I take a shower, I miss the tugging of the pant legs when I am needed for something, I miss the sweet calls of  ‘Mommy come play with me’ from the other room.   But I am also thankful to God that my son is a healthy, adventurous boy who has been with me for 10 wonderful years.    He has now grown into someone who loves the Lord, enjoys a good conversation about anything that involves facts,  loves getting dirty in the mud, and is one of the greatest travel buddies I’ve ever had.

Lately he has been really interested in my projects, and has been asking me what I will be working on next when I am in between projects.   He has enjoyed going with me searching for my next project and I can see a huge change in him that has happened recently, where he is really understanding and appreciating the work and love I put into my furniture makeovers.   As a mother, it is such a great feeling to have a son that wants to learn from you and also looks up to you.  And now I also see, that even though he is getting older, he still does need me, just in different ways.   This morning before school, he hugged me and said “Mom, thanks for making my new dresser and my other desk too, I really like them both.”  Ahh, talk about melting a mothers heart!

I have slowly been working on getting his room together and out of all of the rooms in the house, his is still my favorite, and the closest to being ‘complete’ .   Last year, I worked on making over an old desk from a thrift store for his room, and this year I have been in search of a long dresser with plenty of drawers for his clothes & toys.   I was lucky enough to have a friend donate a dresser to me over the weekend and once I saw it, I knew it was exactly what I had been looking for , for my little mans room!

This is what the dresser looked like before;

www.endlessacresfarmtiques.com

I let my son pick out the colors and theme for the dresser.  Below is a list of the changes that I made;

  •  Stained the top of the dresser & legs with 3 coats of Minwax Polyshades in Classic Black.
  • Painted dresser & drawers in red satin paint.
  • Stained over the entire dresser & drawers with Minwax Poly-shades in Classic Black (which is stain + polyurethane) to give it a dirty/aged look as my son requested.
  • Lined the drawers with ripped out pages from a 1973 issue of Popular Science Magazine.

I decided to use the original copper pulls that were on the dresser, I just love the patina that they have and their simple, straight lines.

dsc_8699wm

I completed this dresser in a day and today I am planning on setting it up in my sons bedroom to surprise him with the complete product when he gets home from school

dsc_8688wm

I hope you have enjoyed my latest furniture makeover, and that you leave feeling inspired to take on a project at your house too!

Thanks for reading,

~Kelly

Potato Bin End Tables.

Have you ever had an ah-ha moment?!  As an artist and entrepreneur, I find myself getting several… every single day.   How do I know which ones to take seriously and which ones to let go?!   That is the hard part.  This can sometimes be overwhelming for many artists and entrepreneurs, but that is where focus and vision come into play.   If I gave in to every single idea I had, I would either be A.) completely broke B.) completely tired or C.) go completely insane.    I don’t want to be any 3 of those!  I want to continue to love what I do.  So, if I get an idea and I can’t make it happen right away, I will write it down in a notebook and sometimes, the idea never travels further than between the lines on a white piece of paper, but for me, that is enough, and I have come to be okay with that,  for most ideas.   Sometimes I will come back to an idea 1 year later and make it happen as well.    Then sometimes, there is an idea , or an ah-ha moment like I mentioned above, that I see so clearly in my head, that I have to jump up at that exact moment and make it happen.   These potato bin end tables, are one of those ideas.


I have had these old wood potato bins for about a year, they have traveled to two different homes with me as I’ve moved, and have been used in about 6 different rooms for different purposes, like shoe boxes in the porch, stacked 2 high for shelving in my daughters room, set next to each other to make a bench,  put together for a coffee table in the basement, or filled with toys.   None of those ideas, although neat, felt like they were how the bins were to be given a new life.   They were meant for something more.

I took the bins and jumped into a project the day after the idea was visualized in my head.

bin1

I stripped the old paint off of the back side of the bins, which would now be the top part of the end tables.

bin2

Once most of the paint was stripped, I sanded down the tops so they were smooth.


I painted the bins in a beautiful green, called ‘Preppy Green’ (the same green I also recently used on a desk makeover ) ,

bin3

Next, I used a brown stain + polyurethane from Minwax , called Minwax Polyshades in Espresso brown to lightly go over every side of the bins.  This worked great as the stain stuck in all of the imperfections of the bin, showing off  their age and history and giving them a more antique look.    I stained the new tops of the bins with 2 coats of the same stain to give them a unified look and make them be viewable as actual end tables, not just potato bins, and for a bit of sophistication.

I am completely happy with how they turned out, and even more ecstatic that the vision I saw so clearly in my head, is now in my living room and I can look at them every day, knowing I DID IT and I brought my vision to life!

Below are the after photos,  I hope you like them as much as I do!

bin4bin5


Thanks for reading,  for more inspiration from Anchored Way, visit me over on Facebook!

~Kelly

Purple nursery dresser.

Over the Summer I had a potential client come to me with a request to find and makeover a dresser for their (soon to be) bundle of joy that would be arriving sometime in September of this year.

We worked together searching online and in stores to find just the perfect dresser that would fit their needs and style.   She found a wonderful piece on Craigslist, dropped it off at my house- and I got to work!

Here are the before and after photos from the makeover I did, enjoy!

  Dresser Before;

1

Dresser After;

2

3.jpg

After priming, painting, drilling holes & adding new hardware, and lining the drawers- this dresser was all set for a sweet newborns’ nursery!

Thanks for reading,

~Kelly

Blue desk.

“No great artist ever sees things as they really are. If he did, he would cease to be an artist.” ~ Oscar Wilde

My 9 year old son [R] has been asking me for a desk for his room for about a year now. I finally decided now was the perfect time to grant his request. Now, I could have went out and purchased a brand new desk for hundreds of dollars, but that would defeat the purpose of my budget friendly and original home design style.

I picked up a used, normal-looking desk from Hope Gospel Mission Bargain Center in Eau Claire, Wisconsin for about $25.00.

desk1

The desk has deep drawers and lots of space on top for him to work on-whatever it is 9 year old boys work on. (Think Legos, drawing, puzzles, games, etc)

Do you see any potential in this desk? I have been blessed with eyes that see beyond what an object is-and can see the shape and size of something and be able to picture the ways it could be up-cycled , changed, and used in unique ways.

Here are the changes I made to the desk to make it original and unique for my sons bedroom.

First, I washed the entire desk down, inside and out to remove any dirt and dust, and removed all of the hardware (knobs + drawer pulls).

Next I primed the entire piece, front, back, inside, out, drawers and all with Zinsser primer.

desk2

After waiting [very impatiently] for the primer to dry, it was time for the first coat of color!

I let my son pick out the color at Menards, he chose the shade of ‘Crater Lake’ .

I’m such a messy painter- at least you can’t tell by looking at the finished piece, just by looking at me..when finished! (hah!)

desk3

Yep, sometimes..I paint barefoot.

desk4(1)

After again, waiting very impatiently for the first coat of paint to dry, I repeated the process 2 more times to ensure I had the desk 100% covered nice and thick to stand up to my sons use. (and of course had to quickly test and see how the new hardware looked)

Next, with Minwax Polyshades Stain + Polyurithane in the color ‘Espresso’ Satin, I brushed on the stain, working in sections. Letting the stain + poly dry for just 2-3 minutes, I took a lint free rag, and wipe away the portion of the stain, leaving behind a small amount of stain, choosing to leave more around the edges where most likely the desk would have been touched by the previous owner,etc. I repeated this process 1 more time until it looked just right. desk5

Once the desk was 100% dry (I let it dry overnight about 12 hours before touching) I added the new hardware (had to bust out the ol’ drill and make the holes a little bit larger to fit the new knobs) …

Desk6

…and then added a long vintage license plate on the front drawer to cover the flowery design that my son didn’t like. The license plate was cut down to size with tin snips, and attached to the front drawer by drilling holes in the plate where the knobs were able to be placed through and attach the plate securely.

desk7

I thought at this point I was done. But as I opened the drawers to look back at my work, I felt something was missing. It needed a bit more character. I searched high and low online and in stores for a drawer liner that would compliment this piece, and also make my son happy. I had found…nothing. I ended buying just plain black contact paper, set it in the drawer to see how it would look- and just wasn’t feeling it. It still, needed something more. I let the entire desk project sit for a few days and was hoping something would come to me if I walked away from the project for some time.

Then I was in my home office, and was looking at a map I framed of Montana, when it hit me, like a bolt of lightning. I would line his drawers with maps!!! Y E S! He was so very excited when I told him my idea.

After measuring, and cutting the Montana & Minnesota maps to size, I sprayed on spray-on adhesive, and place the maps inside each of the drawers. I finished by spraying Krylon Acrylic coating in clear matte finish on top of each map inside the drawer which will then make the maps water-resistant.

Desk8

desk9
Desk10

Desk11

Desk12

So, there you have it. Open your eyes to see beyond what an item is, to see how you can change it and make it unique-and completely YOU!

Thanks for reading,

~Kelly