Phone Table Makeover

An old handmade wood phone table; something that might not catch everyone’s eye. However, it definitely caught mine. I saw potential in this old table, and knew it would be a great DIY project for my 11 year old daughter to help me with!

 This summer I have made it a priority to involve either one or both of my children in any DIY project that I work on. To be able to include them in what I am passionate about, and to teach them the basic use of different hand and power tools, has helped me to fall in love all over again with transforming basic pieces of furniture into unique pieces of art.

For my latest project, my daughter got to pretty much run the show. I let her choose the paint color and many design aspects of the entire piece. She picked out the new drawer pull, drawer liner, and the sign for the side of the table, and she even picked out the cute vintage phone to help stage our new phone table.

Below is a series of photos that we took during our project.

The first step to any good restoration project, is sanding. After sanding, Cam got to work on painting the table. She mixed Beyond Paint’s ‘Soft Grey’ & ‘Pebble’ and called it Cobblestone. Once the table had a few coats of grey, we then worked together to stain and poly the entire piece to give it and aged look as well as give it a nice protective coat of poly. For this, we used Rust-oleum’s Stain + Polyurethane in Dark Walnut. I almost forgot to mention, that I also ‘knocked off’ the top trim detail on the cabinet to give it a more modern and clean look, and because one edge was already broken off when I got it.

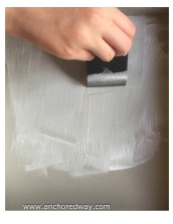
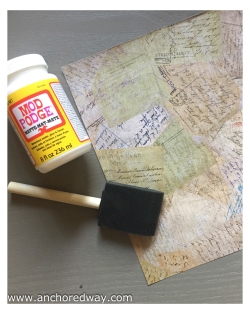
The next step is always the hardest: waiting for it to dry! During this time, I taught Cam the fun of using Mod-Podge to apply a piece of postcard scrapbook paper as a liner in the drawer. I think she liked doing this so much that she might just mod-podge our entire apartment!

Cam enjoyed picking out different yardsticks to use for the front of the drawer and the top of the cabinet. Once she had the yardsticks picked out, I got to work measuring and cutting them with a miter saw. I had to do a little mix and match on the top with some different sizes, but in the end it all worked out and they fit perfectly! Cam was in charge of laying down the wood glue, and placing the yard sticks in their places, then we hammered them into place. I used my nail gun at first, but unfortunately, once I got to the thinner yardsticks, the power of the nail gun was a bit too much, so I went back to the good ol’ fashioned hammer and nail, and actually like this look better when working on vintage piece.

Once all of the yardsticks were attached, we sanded down the edges to give them a more uniform look. Then it was time to add some stain and poly! A bit of brushing it on and dabbing it on gave it a nice worn wood look.

The next step was for me to attach the new handle. Since there had never been a handle or a pull on this drawer, I had to measure for the two new holes to be drilled. I’m no perfectionist when it comes to making things even or straight, but somehow, I got it on there perfectly in the right spot!

Finally, we attached the phone sign to the side, tied an old key to the front drawer pull  and it was complete.

We took our new phone table on a little joy ride around the city of Eau Claire until we found a quiet spot for a photo shoot. I wanted to name the table, but Cam said we couldn’t or she would get too attached to it! So, here it is, our nameless, wonderfully restored and reinvented phone table:

Before:

Table After:
Table After (Above and Below):
202415161922

Thanks so much for joining us on our latest DIY adventure!

As always, feel free to subscribe to keep up with our latest projects!
Thanks for reading,
~ Kelly (and Cam).

Minneapolis Home & Garden Show 2016

“As we let our own light shine, we unconsciously give other people the permission to do the same.” – Nelson Mandela

If you are an artist in any form, (painter, architect, contractor, wood-worker, writer, photographer, etc) than you understand how important continually finding inspiration is.    Sometimes as artists, we can get inspired by something we see on tv, a magazine, a walk in nature, or attending an event like the Minneapolis Home and Garden Show!

This past Saturday, I attended  The Minneapolis Home and Garden show.

My husband dropped the kids and I off at The Minneapolis Convention Center around 9:45 am, we flew in the doors in a rush to hear Matt Muenster speak at 10:00! We made it to the area he was at, 5 minutes prior to show time!  If you have never been to the Convention Center, it is a very big space, especially when you don’t know exactly where you are going.

Matt is an interior designer, licensed contractor and tv personality on HGTV’s Bath Crashers.  He is also partnered with Decolav and has teamed up with them to create an exclusive collection of stylish bathroom products.

Matt walked out onto the stage dressed sharp with a big heart warming smile on his face.


He gave a wonderful talk and I truly felt so inspired while listening to him.  He shared some insider information about Bath Crashers, how they pick the Bath Crasher winners, “You need to be the coolest of everyone we talk to!” He said.  I liked that.  His honesty, his humbleness and knowledge poured out of him during his talk.  He also shared some tips about crashing your own bathroom, and mentioned to focus on one statement piece, as in a custom mural wall.  One thing that really stuck with me that I will take with me while working on our own bathroom, is to not waste your bathroom space, “It is valuable square footage,” Matt said, “Don’t waste it just to go in and out of to take care of business, make it a place to relax.  If you like coffee, put in an espresso maker. (He is speaking my language there!)   “Don’t worry about what the neighbors think, what the next possible home owner may think, incorporate what you love into your space!”    I wish I would have videoed his entire talk!

We were blessed with the opportunity to meet Matt and get his signature and a photo.   My 7 year old daughter made Matt a birthday card which included a Bathroom Mood Board on the inside with bathroom design pieces from my magazines, like a bath tub, lighting, sink, wall hangings, flooring, paint color etc.


After the excitement of meeting Matt, we headed into the Auditorium to see The Property Brothers!  We got into the auditorium over 40 minutes prior to their talk, and it was already over half way full.  They drew a crowd of thousands! When they walked out onto stage, just like when Matt did, the kids looked at me, and I at them, and we all were embracing the fact that these incredible men that we see just about daily in our living room, on television- are real! Just like us!  Camryn kept saying, “Mommy this is so weird!”

Drew and Jonathan Scott, of the Property Brothers gave out some great advice about real estate investing, paying off your mortgage, and of course they tied in some humorous skits and videos as well.  They are quite the funny duo!


img_7295
The kids with The Property Brothers, kind of.

img_7311
Rayce waiting for The Property Brothers to take the stage!  Look at that crowd!

img_7321
Drew and Jonathan Scott on stage.

img_7319-1
img_7322-1

img_7328-1
Hey look, here we are with The Property Brothers! Again, kind of.

After The Property Brothers finished their talk, and we rushed back to see them again on the smaller stage.  We enjoyed a few delicious popcorn samples near by, when we heard Matt Muenster call out Camryns name!  She smiled so big!  He thanked her again for the birthday card, and we took the opportunity for another photo with him.  This guy is a class act!   As we walked away, Rayce said, “I can’t believe he remembered Camryns name!”  Then Camryn said,”I think  it’s because I was wearing a blue jacket.”    Camryn has been carrying around her signature from Matt everywhere, since we got home on Saturday night and she asked that it be hung above her creative art area, so she can see it while she is working her art projects.

img_7357
The kids and I with Matt Muenster of HGTV’s Bath Crashers.


img_7388

Once our excitement decreased from getting to talk with Matt again, we wandered around the Home Show and enjoyed some lunch.  We only got through about 1/3 of the booths in the limited time that we had.  Next year we will be sure to allow more time to enjoy at the show.

Ms Macs Antiques.  Such a beautiful booth set up!


I love this guy!

After lunch, we headed to the long line to wait to go look at the Tiny Home Village! My 12 year old son was begging me to go see these.  I am so glad we did!  I loved the simplistic design and really loved the way that they were staged inside.  The details are important1  I see myself having a Tiny Home someday, tucked alongside a big mountain, for a second vacation home.  I’m a big dreamer, with dreams of a little house in the mountains.

This was my sons favorite Tiny Home.


What a fun day!  I left the home show, feeling so inspired, after meeting Matt, hearing him and The Property Brothers talk, and seeing all kinds of project ideas I could incorporate into my own home.   I would highly recommend the Minneapolis Home & Garden show to anyone who is looking for ideas, inspiration, or quality craftsmen and women who can help them bring their ideas for their home, to life.

I am already looking forward to our adventures at the home show next year!  Maybe I will see you there too?!

Remember you can follow along with my DIY adventures over on Facebook too!

signature


Potato Sack Ottoman

“The seeker embarks on a journey to find what he wants, and discovers, along the way, what he needs.”

Two weeks ago I came across a great little ottoman at Hope Gospel Mission Bargain Center in Eau Claire, Wi for $3.00!  After my employee discount the total came to around $2.80! What a deal! (p.s. a tip for shopping there, if you are 50+, on Tuesdays you can save 20% off your entire purchase ! )

I just loved the style of this ottoman and knew it was a piece of furniture that I could breathe new life into.  Below is what the ottoman looked like as I found it at the Bargain Center, and what was underneath that dirty green fabric!

I let it sit in my living room for a few days, where I could see it, and try to figure out a plan for it. I kept going back and forth between giving it a light beach cottage feel, or a Western rustic style.

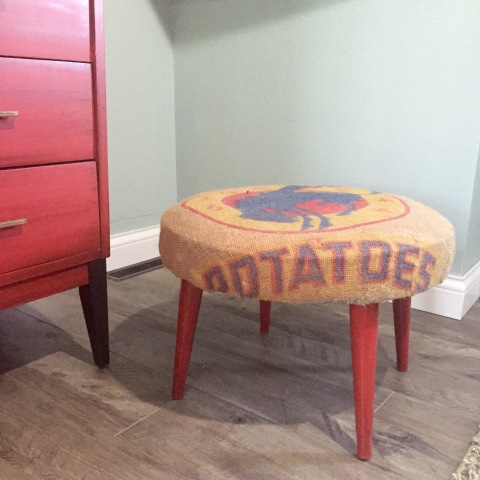
As I looked around my home to see what I had for material to cover the top of it, I came across an old potato sack that I found last year at Oronoco Gold Rush Days, where I went on a hunt for anything that had a Western design or feel to it.
The potato sack was dirty and had stains all over it, that discouraged me a bit, but then I discovered that I could simply just wash the stains out!

Below are photos of the potato sack getting a bath.  I simply filled the bath tub with warm water and a bit of laundry detergent and gave it a good 10 minute soak, then scrubbed gently with a scrub brush in the areas that it had dirt stains, wrung it out, then hung it out on the clothesline to dry over night!


Once the potato sack was fully dry, I cut it open along the seams on the side and bottom, laid it out on the floor, image side down, set the ottoman upside down on top it it and cut a circle about 4+ inches bigger than the ottoman, so I would have enough material to go over the sides, and underneath the ottoman where I then secured it with staples, using a Staple Gun.    After the potato sack was secured, I then painted the legs red and topped them off with Minwax Polyshades stain + poly, and it was finished!

This was a really fun and easy project and the great part is that if I decide I want a different style, it is simple to removed the potato sack and recover the ottoman!  But for now, it looks right at home in our old farmhouse.

I hope this blog post has inspired you to see beyond what something IS and to see what it’s potential can be!

Have a beautiful Sunday, get outside and enjoy the sunshine!

Remember, you can follow along with my DIY adventures over on Facebook as well!

signature

Industrial Chair.

“When I let go of all I am, I become what I might be.” – Lao Tzo

Potential is a beautiful thing.   To see something and know that it can be more than what it currently is takes a special kind of vision.    All things, all people hold an unlimited amount of potential.  Sometimes, all it takes to let go of what one is, and become what they might be,  is for one person to say, “I believe in you.”

As I was in search of a chair for my sons industrial style bedroom, I came across this lonely little chair at Hope Gospel Mission Bargain Center in Eau Claire, Wisconsin.  I knew right then and there, that it was full of amazing potential.  I could already see it in my mind, proudly sitting in a dark stain, next to my sons desk.

Before

 Do you hear it’s cries for help?  All it needed was for some kind soul to come along, and see the potential that it held.  For this lucky chair,  that someone, was me.

I started working on the desk chair right away, I even had a nice little volunteer help me start sanding down the seat.

img_6462

After sanding the entire chair, both with an orbital sander, and then with a folded up piece of sandpaper by hand in the hard to reach areas, I dusted off the chair with tack cloth.

Once the chair was wiped completely clean of any dust or debris, I then started to stain it, using the color by Minwax, ‘English Chestnut’ , one of my favorite stain colors, it has such a rich, deep tone, but not too dark.    Once I completed 2 coats of stain and allowed for dry time, I then hand wiped on Minwax Wipe-On Polyurethane in high gloss.

The once sad, neglected office chair, suddenly came back to life.   As the chair finally became what it always had potential to become, it also gained a name.  Yes, a name.  My 7 year old daughter was convinced it deserved a name, I definitely agree with her.

So, my friends, you’ve waited long enough.   I would like to officially introduce you to the newest member of our little farm house;

Stanley.   

3(1)


7(1)

Isn’t Stanley handsome?  He sure catches my eye!   Here he is, in his new location in our home, sitting proudly in our sons bedroom;


2(1)

I hope by seeing the way that Stanley here came alive and how I believed in the potential he had, inspires and encourages you to open your eyes, see the beauty that is possible in all things, and that you can feel empowered to take on your own DIY projects!

I hope you all have a beautiful Sunday evening!  Be sure to follow Anchored Way on Facebook if you want to see more DIY ideas, along with weekly inspiration!
signature