Railroad crate coffee table.

I love it when something ordinary jumps out at me and I instantly see how it can be extraordinary.

Last month I came across something that stopped me in my tracks, (pun intended)… An old Railway Express Agency shipping crate.  It was worn, dried out, beat up, and begging for some true old fashioned TLC.

Without hesitation I hauled it home, where it has been sitting in the corner of my living room, until last week when I finally decided to move it out into my workshop where I have a line up of projects ready to tackle.  I figure if I added it into the line up, there would be a better chance that I would be inspired to work on it!

I immediately knew what this old crate needed and I got to work.

I started by scrubbing it down and using tack cloth all over to make sure there wasn’t any loose dust or particles before I went to the next step.

Next, I added two coats of clear Zinsser Shellac.

I was working in my work shop on a mid 80’s day, so the Shellac dried extremely fast.  I was impressed at the dry time, and it didn’t leave any sticky feeling behind.

I added Shellac to the entire exterior, interior, and lid.  Once the Shellac was dry, it was time to add on the caster wheels.  I picked these wheels up a few years ago and have been waiting to find the right project to use them on.  This was it!

Adding the shellac pulled out all  of the historical characteristics, markings and words.  I love the transformation that shellac does to wood! It is a beautiful process!

I remember during my childhood when my dad would ask me to assist him with projects and it would always make me feel so special to help him, even if it was just handing him nails, I felt so important.  Now, when I work on projects, I try to find a task somewhere during, that my kids can help me with, hoping that when they grow up, they will not only have memories, but will have useful skills that they can use too!

I asked my son R to help me with the caster wheels.  He is usually a little hesitant with projects, but with me showing him an example and putting the first screw in with the hand drill,  he jumped right in and took over.  He is 13 now, and I feel like time is flying by. I want to be the very best mom possible and teach him all that I know, while he is still here with me!

Adding caster wheels is not a complicated task!  Don’t let it scare you! Caster wheels come in many different sizes and you can get ones that swivel 360 degrees, or ones that only roll backward and forward in a straight line.  I always get the ones that do a complete swivel, this makes it so much easier when moving things around, especially if it’s something like a coffee table that gets pushed and pulled in all directions by everyone

After he added on the four caster wheels, it was time to add some pulls onto the lid, for easy opening.  This is when my son ran way.  Hah.  I give thanks that he stayed with more for at least a small portion of my project!

The pulls were picked out by my 8 year old daughter. We were looking for something rustic that looked like it had always been a part of this old crate.

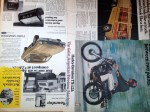
Since these pulls had a bit of a bump out on the bottom where it would meet the crate, I had to measure the size of that bump with the drill bit gauge. (Pictured above on the left). I used that size drill bit to go into the wood just as deep as the bottom of the pull needed to go in, then on the underside of the lid, I drilled in a hole that was one size smaller than the screw for a tight fit.  I didn’t have any pull screws on hand that were the right size, so I made due by placing two washers in between the lid and each screw so it was nice and snug and secure.

One the pulls were installed, it was time to sit back and smile at another project well done and another piece of forgotten furniture brought back to life and rescued!

signature

Travel inspired desk.

“For my part, I travel not to go anywhere, but to go. I travel for travel’s sake. The great affair is to move.” – Robert Louis Stevenson

If you are a regular follower of Anchored Way Trading Co, you by now know that I am a lover of travel, adventure, wandering back roads and the outdoors. I find myself often day-dreaming of driving the car, down an old back road in the mountains of Montana, windows down, radio on, the wind blowing through my hair… (okay let’s be realistic,  … * the wind blowing my hair into my face…) , and nowhere to go, ..but everywhere.

I’m a dreamer.   A day dreamer, yes.  A night dreamer, of course, but most importantly,  I believe in the dreams that God has instilled into this heart of mine.   Progress, no matter how slow, is progress.   A step forward, is still a step, no matter if it’s a running step or a walking step.    Little by little, we get closer to becoming who God created us to be.

With each piece of furniture I create, I feel more like me & I feel my wings opening further.  This, an artist, is who I am.   I am here, to create and inspire you.

I came across this lonely desk while I was working at Hope Gospel Mission Bargain Center in Eau Claire, Wisconsin and knew it needed to come home with me to my workshop.  I knew, it had potential, I could see it.

Desk -- Before

I was originally planning on giving the desk a new life and selling it at my favorite little local coffee shop, The Living Room Coffee House in Eau Claire, but once finished and placed in a corner of my living room,  it was like the desk looked at me and said ‘Let me stay right here,’  and there, it still sits.  Now it has a new life, a new home and is once again loved and provides my kids and my family with a little school / home work station and organization for all of the papers they bring home from school every day.

deskcollage

adc_7520wm

adc_7528wm


There it is friends!   Completely  perfect for our family!   I used an old Montana map, that shows two of the towns where my kids first saw the mountains a few years ago on a road trip.  I was blessed to have been given my late Grandfathers chair that he used in his basement workshop at his desk, every time I look at it, my heart smiles, and every time I sit in it, like I am now, writing this blog post, I know my Grandfather would be proud of the work I do.

If you are interested in a custom furniture piece, like this for your home, or place of business, feel free to contact me with any questions; endlessacres@live.com

You can also follow Anchored Way Trading Co. on Facebook.

Have a blessed day- get out there and unleash your inner artist!  Dream, Create, Believe in yourself!

signature


Products used in this transformation;

Red license plate dresser.

“Go and make interesting mistakes, make amazing mistakes, make glorious and fantastic mistakes. Break rules. Leave the world more interesting for your being here. Make. Good. Art.” ~Neil Gaiman

I love being an artist.  It is my passion.  I love the feelings that come along with creating and transforming a piece of furniture.   It gives me such satisfaction to take something old, worn, and broken and restoring it and giving it a brand new life and a new purpose.
Last week I got an idea for this brown dresser and marched forward with the vision and the details came to me as I went along.  Here is the before image of the dresser;
Before. Red license plate dresser by Endless Acres Farmtiques
How I transformed this dresser:
  • Sanded and painted red.
  • Applied a thin layer of Minwax stain + poly.
  • Removed drawer pulls and filled in holes with wood filler.
  • Attached rusty license plates to each drawer, for character.
Dresser after:
dsc_9805wm
I hope you enjoyed this transformation!
blogsignature

TV Stand dresser.

   ‘ The art of living is always to make a good thing out of a bad thing.’

  ~ E.F. Schmacher

Art to me is about vision.  It is about seeing potential in something that others may not see.  It is about taking something and changing it, making it unique , making it your own.  It is about expanding your eyes to see beyond the norm and the usual.  Today’s project is just that.
It is about how I took a normal little white dresser and made it into something different, and gave it a new life as a TV stand.

Here is the dresser as it was before:

tv dresser before www.endlessacresfarmtiques.com

Here is a list of what I did to the dresser to make it into a tv stand;

  • Sanded, and painted entire piece,  including sides and insides of the drawers in Sherwin Williams ‘Light French Grey’ paint.
  • Removed the top drawer and added in old cedar fence boards using small finishing nails, to make a shelf.
  •  Drilled small hole into back wall of dresser to allow cords to go through if used as a TV stand.
  • Replaced original hardware with yardsticks for drawer pulls.  The yard sticks have been stained lightly.

Here is the dresser after;

dsc_8834wm

Thanks for viewing my latest project!  If you like what you see here on the blog, you can follow along with me on Facebook!

~Kelly

9 drawer dresser.

“As soon as I saw you, I knew an adventure was going to happen.

~ Winnie The Pooh

My son just turned 10 last week.   I am trying my hardest to not let his age make me feel sad about the fact that I am losing my ‘baby’ boy.   It is a hard transition when they go from sweet little boy who follows mommy everywhere  to becoming so independent and not needing their mommy as much any more.   I miss those pounding little fists on the bathroom door every time I take a shower, I miss the tugging of the pant legs when I am needed for something, I miss the sweet calls of  ‘Mommy come play with me’ from the other room.   But I am also thankful to God that my son is a healthy, adventurous boy who has been with me for 10 wonderful years.    He has now grown into someone who loves the Lord, enjoys a good conversation about anything that involves facts,  loves getting dirty in the mud, and is one of the greatest travel buddies I’ve ever had.

Lately he has been really interested in my projects, and has been asking me what I will be working on next when I am in between projects.   He has enjoyed going with me searching for my next project and I can see a huge change in him that has happened recently, where he is really understanding and appreciating the work and love I put into my furniture makeovers.   As a mother, it is such a great feeling to have a son that wants to learn from you and also looks up to you.  And now I also see, that even though he is getting older, he still does need me, just in different ways.   This morning before school, he hugged me and said “Mom, thanks for making my new dresser and my other desk too, I really like them both.”  Ahh, talk about melting a mothers heart!

I have slowly been working on getting his room together and out of all of the rooms in the house, his is still my favorite, and the closest to being ‘complete’ .   Last year, I worked on making over an old desk from a thrift store for his room, and this year I have been in search of a long dresser with plenty of drawers for his clothes & toys.   I was lucky enough to have a friend donate a dresser to me over the weekend and once I saw it, I knew it was exactly what I had been looking for , for my little mans room!

This is what the dresser looked like before;

www.endlessacresfarmtiques.com

I let my son pick out the colors and theme for the dresser.  Below is a list of the changes that I made;

  •  Stained the top of the dresser & legs with 3 coats of Minwax Polyshades in Classic Black.
  • Painted dresser & drawers in red satin paint.
  • Stained over the entire dresser & drawers with Minwax Poly-shades in Classic Black (which is stain + polyurethane) to give it a dirty/aged look as my son requested.
  • Lined the drawers with ripped out pages from a 1973 issue of Popular Science Magazine.

I decided to use the original copper pulls that were on the dresser, I just love the patina that they have and their simple, straight lines.

dsc_8699wm

I completed this dresser in a day and today I am planning on setting it up in my sons bedroom to surprise him with the complete product when he gets home from school

dsc_8688wm

I hope you have enjoyed my latest furniture makeover, and that you leave feeling inspired to take on a project at your house too!

Thanks for reading,

~Kelly

Potato Bin End Tables.

Have you ever had an ah-ha moment?!  As an artist and entrepreneur, I find myself getting several… every single day.   How do I know which ones to take seriously and which ones to let go?!   That is the hard part.  This can sometimes be overwhelming for many artists and entrepreneurs, but that is where focus and vision come into play.   If I gave in to every single idea I had, I would either be A.) completely broke B.) completely tired or C.) go completely insane.    I don’t want to be any 3 of those!  I want to continue to love what I do.  So, if I get an idea and I can’t make it happen right away, I will write it down in a notebook and sometimes, the idea never travels further than between the lines on a white piece of paper, but for me, that is enough, and I have come to be okay with that,  for most ideas.   Sometimes I will come back to an idea 1 year later and make it happen as well.    Then sometimes, there is an idea , or an ah-ha moment like I mentioned above, that I see so clearly in my head, that I have to jump up at that exact moment and make it happen.   These potato bin end tables, are one of those ideas.


I have had these old wood potato bins for about a year, they have traveled to two different homes with me as I’ve moved, and have been used in about 6 different rooms for different purposes, like shoe boxes in the porch, stacked 2 high for shelving in my daughters room, set next to each other to make a bench,  put together for a coffee table in the basement, or filled with toys.   None of those ideas, although neat, felt like they were how the bins were to be given a new life.   They were meant for something more.

I took the bins and jumped into a project the day after the idea was visualized in my head.

bin1

I stripped the old paint off of the back side of the bins, which would now be the top part of the end tables.

bin2

Once most of the paint was stripped, I sanded down the tops so they were smooth.


I painted the bins in a beautiful green, called ‘Preppy Green’ (the same green I also recently used on a desk makeover ) ,

bin3

Next, I used a brown stain + polyurethane from Minwax , called Minwax Polyshades in Espresso brown to lightly go over every side of the bins.  This worked great as the stain stuck in all of the imperfections of the bin, showing off  their age and history and giving them a more antique look.    I stained the new tops of the bins with 2 coats of the same stain to give them a unified look and make them be viewable as actual end tables, not just potato bins, and for a bit of sophistication.

I am completely happy with how they turned out, and even more ecstatic that the vision I saw so clearly in my head, is now in my living room and I can look at them every day, knowing I DID IT and I brought my vision to life!

Below are the after photos,  I hope you like them as much as I do!

bin4bin5


Thanks for reading,  for more inspiration from Anchored Way, visit me over on Facebook!

~Kelly

Purple nursery dresser.

Over the Summer I had a potential client come to me with a request to find and makeover a dresser for their (soon to be) bundle of joy that would be arriving sometime in September of this year.

We worked together searching online and in stores to find just the perfect dresser that would fit their needs and style.   She found a wonderful piece on Craigslist, dropped it off at my house- and I got to work!

Here are the before and after photos from the makeover I did, enjoy!

  Dresser Before;

1

Dresser After;

2

3.jpg

After priming, painting, drilling holes & adding new hardware, and lining the drawers- this dresser was all set for a sweet newborns’ nursery!

Thanks for reading,

~Kelly